dernière mise à jour le 03/04/16
Présentation
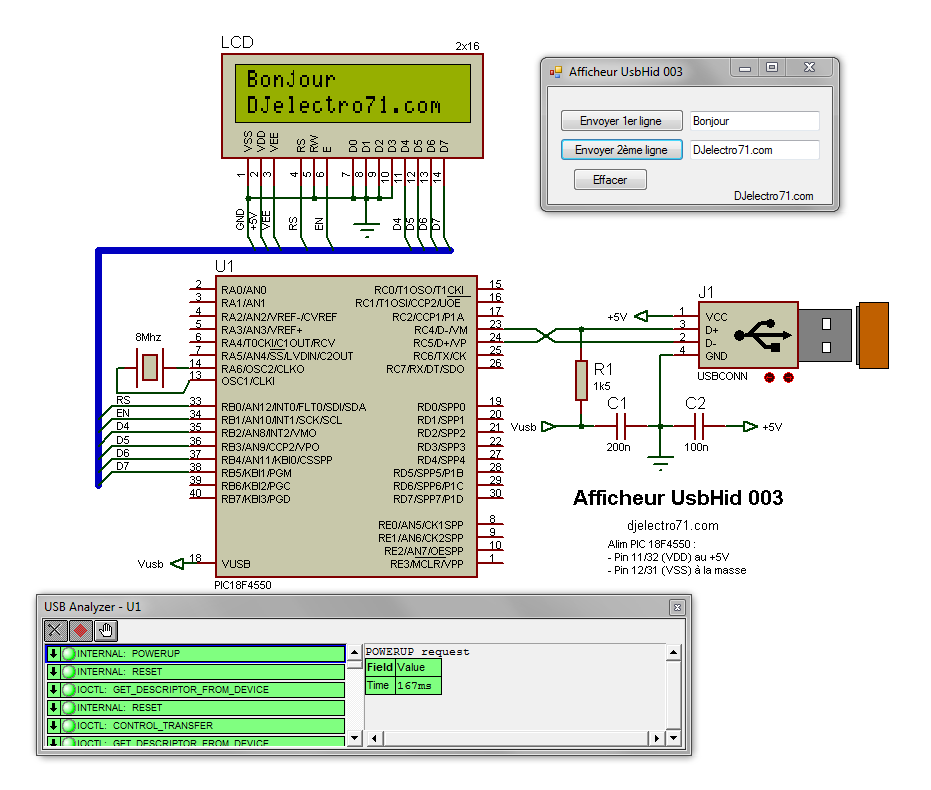
Ce nouveau montage permet d’écrire via un clavier raccorder sur le port USB d’écrire sur les deux lignes de l’afficheur LCD 2×16 caractères. je vous laisse vous plonger dans les lignes de codes situées ci-dessous
Schéma
Programme du PIC
program Afficheur_UsbHid_003;
 var
 ReadBuff: array[64] of byte; absolute 0x500;
 WriteBuff: array[64] of byte; absolute 0x500;
 i, i2:byte;
 iValueColomnLcd, iValueColomnLcd2:byte;
ConverCharByte, ConverCharByte2:byte; LCD_RS : sbit at RB0_bit; LCD_EN : sbit at RB1_bit; LCD_D4 : sbit at RB2_bit; LCD_D5 : sbit at RB3_bit; LCD_D6 : sbit at RB4_bit; LCD_D7 : sbit at RB5_bit; LCD_RS_Direction : sbit at TRISB0_bit; LCD_EN_Direction : sbit at TRISB1_bit; LCD_D4_Direction : sbit at TRISB2_bit; LCD_D5_Direction : sbit at TRISB3_bit; LCD_D6_Direction : sbit at TRISB4_bit; LCD_D7_Direction : sbit at TRISB5_bit; procedure Main_Init; begin TRISB:=%00000000; LATB:=$00; Lcd_Init; Lcd_Cmd(_LCD_CURSOR_OFF) end; procedure Interrupt; begin USB_Interrupt_Proc; end; procedure Write_LCD; begin if (HID_Read()<>0) then begin for i:=0 to 32 do //On compte de 0 à 32 pour la ligne du haut begin if (ReadBuff[i]<>0) then begin ConverCharByte:=Chr(ReadBuff[i]); Lcd_Chr(1,i,ConverCharByte); ReadBuff[i]:=0; end; begin if (ReadBuff[i]=1) then begin iValueColomnLcd:=0; Lcd_Cmd(_LCD_CLEAR); end; end; end; for i2:=32 to 63 do // On compte de 32 à 63 pour la ligne du bas begin if (ReadBuff[i2]<>0) then begin ConverCharByte2:=Chr(ReadBuff[i2]); Lcd_Chr(2,(i2-32),ConverCharByte2); ReadBuff[i2]:=0; end; begin if (ReadBuff[i2]=1) then begin iValueColomnLcd2:=0; Lcd_Cmd(_LCD_CLEAR); end; end; end; end; end; Begin Main_Init; HID_Enable(@Readbuff,@WriteBuff); While true do begin Write_LCd; end; end. |
Prototype
Pas de prototype mais le petit fichier qui va avec Afficheur UsbHid 003
Historiques
03/04/16
– Ajout schéma et modification de la console ainsi que la programmation C#
19/03/16
– Première mise à disposition
